Hello there!
In this tutorial, you will be making something like this:
In this tutorial, you will be making something like this:
Its a relative simple technique to achieve within Adobe After Effekts, which we will be using. This can be applied to any layered image, and could be especially usefull for some cool mattepainting compositioning, just adding your 3D sequences on top. Playing with your DOF will give some interesting results, like the "miniature" feel I have here.
(Click on any image to show a bigger image. Weebly isnt to happy hosting high resolution images)
(Click on any image to show a bigger image. Weebly isnt to happy hosting high resolution images)
So, lets get started! First off, downoad this PSD file:
| postprocess_env.rar |
This file contains all the layers, in two separate groups. The main pillars and the background elements.
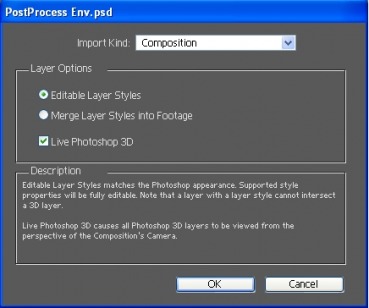
Import the file, just click OK to proceed.

When you first import the PSD it will look something like this. Double click the PostProcess Env composition in the left sidebar to reveal the composition groups in the bottom left. You will see you have two groups there, Pillars and Background elements. These are the layergroups of which the image is composed. Double click on them to open a new tab containg all the layers.

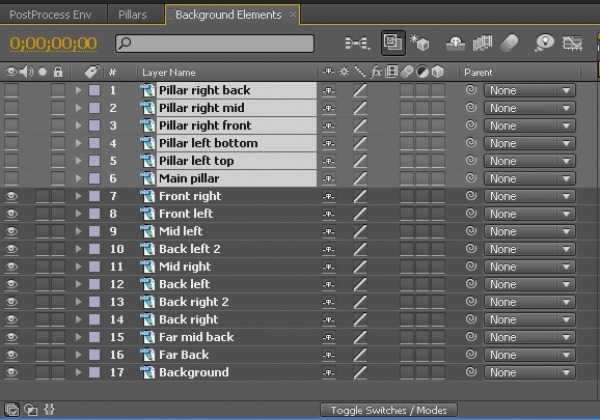
Opening the group will show this. I chose to just to copy and paste the Pillar layers over to the Background Elements. You can leave them as be, or do the same, but I found it better to have them on the same group.
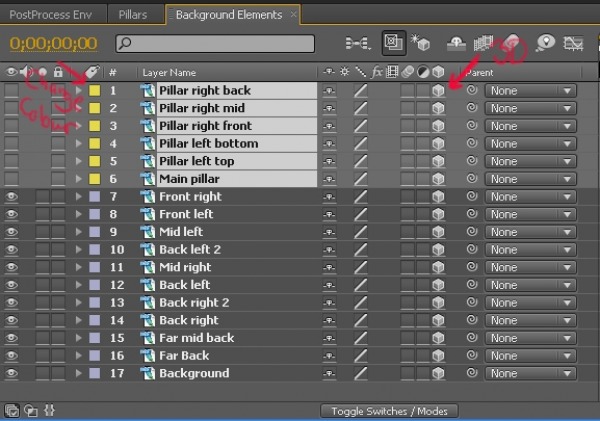
Changing the colour of the layers will help you see the layers better, you will see that better later on. Just select the layers and click the coloured square, and it will change the colour for all selected layers.
For this effect to work we need to put the layers in 3D space, and you do that by clicking the little 3D box as you can see above.
Its important to do so for the layers in both the Background Elements/Pillars tab and the PostProcess Env tab.
For this effect to work we need to put the layers in 3D space, and you do that by clicking the little 3D box as you can see above.
Its important to do so for the layers in both the Background Elements/Pillars tab and the PostProcess Env tab.

Adding camera
Now we need a camera to help us move in 3d space. Go to Layer; New; Camera
Now we need a camera to help us move in 3d space. Go to Layer; New; Camera
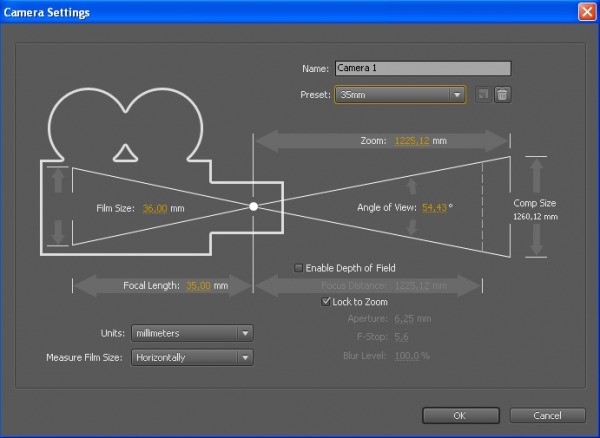
Choose a 35mm camera and click OK.
Add a camera to both the PostProcess Env and Background elements (and/or the pillars)
Add a camera to both the PostProcess Env and Background elements (and/or the pillars)
Moving in 3D space

*2: Chose 2 views.
*1: One view from top, one from the camera.
*1: One view from top, one from the camera.

To get the layers to represent a 3D world, you will need to move them, and since we activated the 3D cube thinghy, we can now move the layers up/down, right/left, forward/backward. Or in XYZ coordinates, if you will.
To start you can hide the Pillar layers by clicking the little eye button on the left side of your layers. We can do these after the background elements.
Now click on the Background layer, you will see it get highlighted, and notice the XYZ gizmo. From the top view, hold SHIFT and press the up arrow key to move the layer backwards, in Z space. It will appear to become smaller as it gets further away. Put it a good distance away, depending on how much distance you would like.
Repeat this process for the remaining layers, until you have something like the above image.
(Remember to unhide the Pillar layers and do those after the background elements are nicely placed!)

Now we have the depth, but the images are all out of scale, so now go over the layers again and rescale them back to the frame size. To do this you just drag the point at the edge, holdig SHIFT to keep it incorrect scale, in the front view, to make it the same size as the frame.
When done it should look like a reverse triangle in your top view.
By pushing the C key or holding down the camera button on the top menu, you find some camera tools, like the orbit tool. You can use this to check how things look in your camera view, seeing if your depth is right or whatnot.
When done it should look like a reverse triangle in your top view.
By pushing the C key or holding down the camera button on the top menu, you find some camera tools, like the orbit tool. You can use this to check how things look in your camera view, seeing if your depth is right or whatnot.

Animating it

To animate it, go back to the PostProcess Env tab. It should update and line up the layers as you did in the Background group automatically, making it possible to do some camera work now.
First we place the point of interest, found in the camera rollout. There is a tiny triangle beside the colour square, click it to reveal more options. Find the POI, click on it (the text). It should frame it in your views. Drag the center dot, holding shift to keep it straight in the top view. Place it somewhere around the Main Pillar layer position. (Exact location can be found in the transform rollout, selecting the layer itself in its group. Copy the relevant Z pos back to the relevant camera Z pos..)
First we place the point of interest, found in the camera rollout. There is a tiny triangle beside the colour square, click it to reveal more options. Find the POI, click on it (the text). It should frame it in your views. Drag the center dot, holding shift to keep it straight in the top view. Place it somewhere around the Main Pillar layer position. (Exact location can be found in the transform rollout, selecting the layer itself in its group. Copy the relevant Z pos back to the relevant camera Z pos..)

Make sure you're at 0 sec in the timeline, and click the button resembling a stopwatch. That makes the program know you want to animate that particular feature, in our instance that would be the position, and maybe the point of interest.
Drag the timeslider to say 3 sec, and play with the position numbers to make the camera pan in. Feel free to explore various positions, how long, etc.
Do so until you find something you like, maybe zooming in toward the main tower pillar.
Drag the timeslider to say 3 sec, and play with the position numbers to make the camera pan in. Feel free to explore various positions, how long, etc.
Do so until you find something you like, maybe zooming in toward the main tower pillar.
After you animate the movement you can play around with the Depth Of Field setting, and animate that aswell, to get some nice results. The higher the number, the more blurred it will get. Cranking up the aperture setting will get you some real nice miniature feel, which I found interesting and cool myself.
The Focus Distance setting will act as the focus of your camera, allowing you to focus in on f.ex. something in the foreground while the rest will go blurry, as with a real camera.
The Focus Distance setting will act as the focus of your camera, allowing you to focus in on f.ex. something in the foreground while the rest will go blurry, as with a real camera.
Other effects

Right click in the PostProcess Env tab to create a new Solid layer. Make it black.
Move it to the top of the stack. Set the blending mode to Screen, which removes darks and keep light parts.
Add a lens flare effect, by Right Clicking the solid layer; Effects; Generate; Lens Flare
Move it around a bit until it works for you, maybe move it around in 3D space in the same way we already have done with the previous layers.
And that's about it. All that's left is basically to render it out.
Go to Composition, in the top menu, and go to "Add to render Queue" That will open a new tab in the layer menu, Render Queue.
Go to Composition, in the top menu, and go to "Add to render Queue" That will open a new tab in the layer menu, Render Queue.
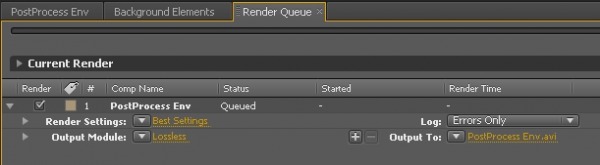
Click where it says "Best Settings".
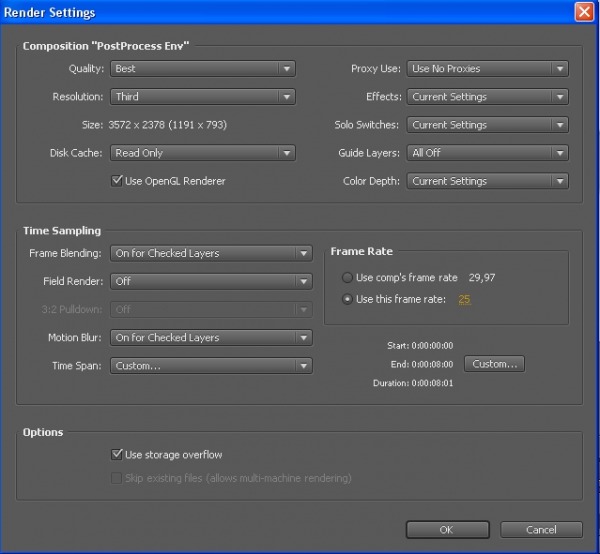
Change the Resolution to a Third. And use the "Use OpenGL Renderer". Make sure the Frame rate is set to 25.
Also change the time to be rendered by clicking the Custom button, below Frame Rate. Set the time to something like 8 sec.
Click OK.
Click where it says "Lossless".
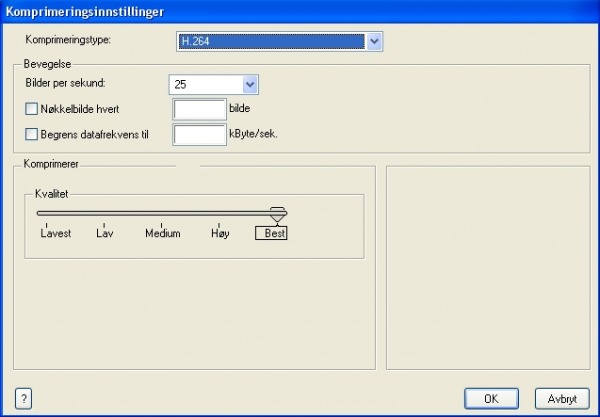
Set the Format to QuickTimeMovie, and compression type to H.264 in the Format Options. Make sure the frame rate is set to 25
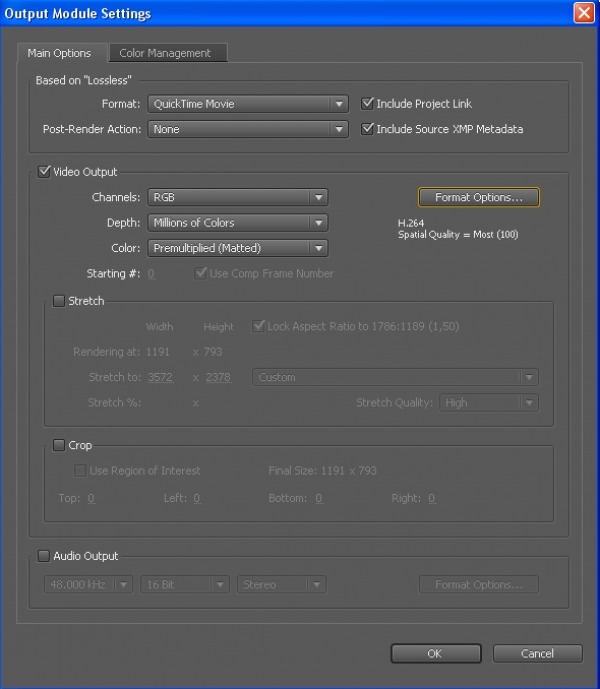
Now click where it should say "PostProcess Env" to select where and what to save your movie as.
You should be golden by now, only thing left now is to hit the render button!
 RSS Feed